
- Need to install electric outlet box without studs nearby?
- How does an old work outlet box work?
- Step 1 Order a studless electrical box.
- Step 2 Trace the outlet on the wall.
- Step 3 Cut the hole into the wall.
- Step 4 Run the cables into the box.
- Step 5 Insert the box into the cut hole.
- Step 6 Fasten the box into the drywall.
- Step 7 Install the face plate.
- Now that you are done.

Last Updated on April 18, 2026 by Johann Holsinger
Need to install electric outlet box without studs nearby?
Installing your newly bought televisin or simply rearranging your home theater system in a much better location is one of the most exciting DIY projects you can do at home.
The problem when mounting your TV brackets is that existing walls may not have electrical sockets to plug in your TV.
And if your desired location doesn’t have studs nearby, this is where a studless electrical box helps.

How does an old work outlet box work?
You can move and replace the old fitting or retrofit the electrical box without fastening the box onto a stud or removing or adding framing to your wall.
An electrical socket box for the studless part of the wall has a simple clamping mechanism that tightens behind the drywall while attaching a screw to the front of the back wall [1].
You can locate these clamps at the back of the box on top and at the bottom of the outlet box, creating a nice secure hold.
Here’s how you can install electric outlet box without studs:

Step 1 Order a studless electrical box.
When looking for an electric box that is for studless installation, make sure to get the right one and not a standard outlet box.
Looking at your choices can be overwhelming.
New workboxes would have fixings on the sides that are to provide access and screws to studs.
You are looking for an outlet box without the side mounting screw holes but instead, look for front-facing screw holes and a small clamping system to grip onto the back of plasterboard when tightened.
They can be sold to thread one electrical device (one gang). These old work boxes are made of PVC.

While others would hold cables for more electrical devices.

Steel remodel boxes usually have plaster ears and secured stronger by madison straps attached on the sides of the box. These straps or side brackets are sold separately.

Some old work outlets do not have boxes inside as they are dedicated to low-voltage cables.

Step 2 Trace the outlet on the wall.
When the outlet arrives and before tracing anything out, prepare the box’s mounting screw by loosening the end a bit.
Most of the fittings come tightened by the manufacturer. Screwing it harder may damage your wall.
Now your outlet box position is ready, start leveling from the bottom edge of the box’s face while sitting flat on the wall.
Start tracing it by marking the four corners with a pencil and drawing a line between the corners.
Do not include the box’s ear. Otherwise, cutting a hole in the box’s ears will leave no wall for clamps to hold on to.

Step 3 Cut the hole into the wall.
You can use different tools for cutting the hole out.
You can use a scoring knife, a drywall saw, a jigsaw, a rotary cutter, a saber saw, or an oscillating tool for cutting the holes.
You can start with a scoring knife and cut the hole completely with any of the saws mentioned.
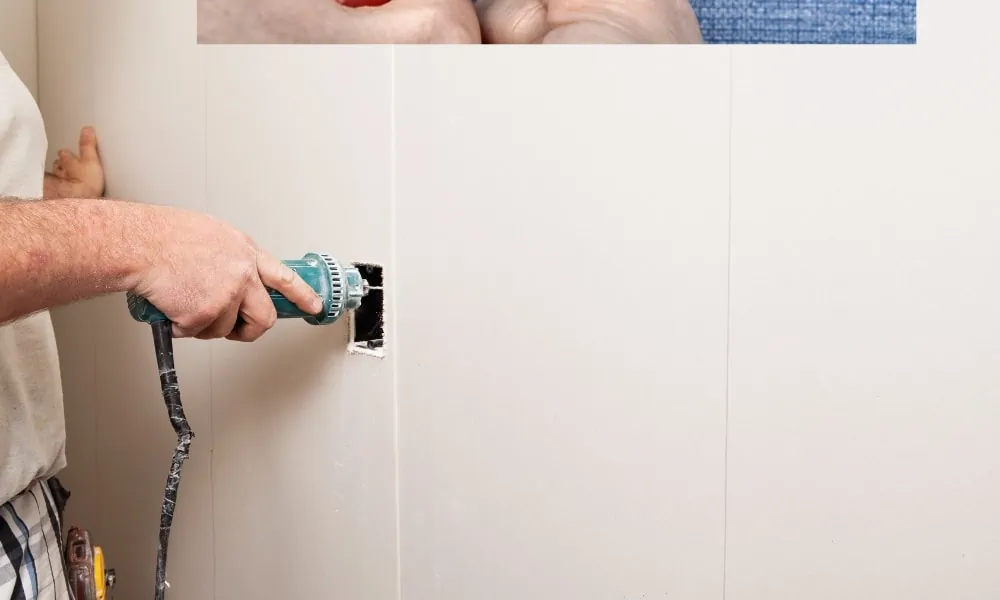
Step 4 Run the cables into the box.
Before inserting the box or threading the old or new cables, pry the clamps open. They can be hard to open if you have already inserted the box.
Turn your power supply off before working with open cables (Never work with live cables).
Thread the wires in the wall cutout before running them out through the box.
.Allot about 8 to 12 inches of excess cable for the wall cutout to the electrical box.
Some boxes have allotments for both power and low-voltage cables.

You want the sheathing still secured from under the clamping tab, about 1 inch above it, with about 6 to 7 inches of exposed cables.
A more flexible old work box would accommodate more power and low-voltage wires for your home entertainment system even without a stud.

Step 5 Insert the box into the cut hole.
You can now insert the box into the cutout in the wall.
You can use the scoring knife to enlarge the hole to accommodate the outlet box if needed.
Step 6 Fasten the box into the drywall.
Tighten the mounting screws as you hold the box, securing the box ears against the drywall.
The clamps will now extend outward as you drive the screw and take a grip behind the drywall.
Tighten until you can feel some resistance but remember not to overtighten as you may damage the wall from to much – force.

Step 7 Install the face plate.
Installing the face plate is no rocket science.
You only have to clip or screw over the electrical box, and that’s it, just make sure to pick one with the buttons you need for the cables you are running.
There are many types of face plates you can install over an old work electrical box, like this recessed outlet box with a face plate from Arlington.

When should you use an in-wall cable concealer kit?
For entertainment systems, nothing beats a complete in-wall cabling kit that you can install without studs.
If you find another way to get fixing, this is so much easier to install.
A complete in-wall cabling kit is much better if you want many different types of wires for your home entertainment or if you want to add more wires later as technology develops.
For anyone who is not comfortable with dangling cables, you can use an in-wall cabling concealer to hide all wires inside the wall.
There are appropriate slots for HDMI, Ethernet, Speaker, and low-voltage cables available.
And you can always add more as there isn’t a limiting amount of jacks as there isn’t a defined faceplate.
It all depends on the devices you’ll install next to each other, run whatever electrical cables you need.
Here are a few tips:
- Ensure you know what cables run behind your walls.
- Do not thread power cables behind your walls yourself.
- Do not run data or audio cables next to or beside electrical cables inside walls.
- Tie those low-voltage cables in bundles!
- Always inspect your cables before running wires behind the wall.

Now that you are done.
You now have installed an outlet even without studs nearby. You can place any device next to your wall plug, like your fixed or full-motion TV mount, and still, work discreetly.
Get ready next for a brand-spanking new wooden coffee table! here’s our recommended in-wall cabling kit for a tidy setup.
Without messy wires, have a cold one on a head turner of a table!
Imagine having a living room bar fridge and an entertainment system that share their spots in the wall without worrying about hidden studs or dangling cables!
More information:
- Old work electrical boxes bs new work electrical boxes published in https://www.thespruce.com/electrical-boxes-old-work-vs-new-1821566


